How to Adjust Tapered Roller Bearings: A Step-by-Step Guide

Tapered roller bearings are widely used in many industries, including automotive, industrial machinery, and heavy-duty applications, thanks to their ability to handle both radial and axial loads. Their unique design makes them ideal for supporting heavy loads and maintaining precision in applications where both thrust and radial forces are present. However, to ensure optimal performance and avoid premature wear, tapered roller bearings need to be correctly installed and adjusted.

In this comprehensive guide, we will walk you through the process of how to adjust tapered roller bearings, provide insights into why proper adjustment is essential, and introduce high-quality tapered roller bearings available at Tapered roller bearings supplier  to ensure longevity and performance in your machinery or vehicles.

What are Tapered Roller Bearings?

Before diving into the adjustment process, it’s essential to understand what tapered roller bearings are and why they’re designed the way they are.

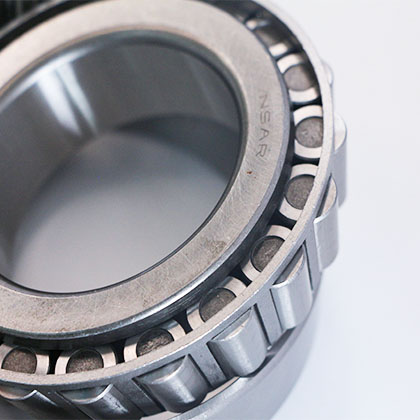
Tapered roller bearings are designed with tapered inner and outer ring raceways, as well as conical rollers. These bearings can support both radial (perpendicular to the shaft) and axial (parallel to the shaft) loads, which makes them suitable for applications like vehicle wheel hubs, transmissions, and gearboxes.

The tapered design allows the bearing to handle heavy combined loads and maintain precision alignment, even under heavy-duty operating conditions. However, due to the design, proper bearing adjustment is crucial to ensure that the bearings perform optimally and avoid premature failure.

Why Proper Adjustment of Tapered Roller Bearings is Crucial

Improper adjustment of tapered roller bearings can lead to several issues, including:

  • Increased friction:Over-tightened bearings increase friction, leading to excessive heat buildup, faster wear, and reduced efficiency.
  • Premature wear:Incorrectly adjusted bearings can lead to uneven distribution of loads, causing premature wear or damage to the bearing surfaces.
  • Excessive play:If the bearing is too loose, it can cause vibration, noise, and decreased precision in your machinery or vehicle, compromising performance and safety.
  • Bearing failure:Continuous operation under incorrect settings can result in catastrophic bearing failure, leading to costly downtime and repairs.

Given these potential problems, it’s essential to ensure that the bearing is adjusted correctly. Below, we provide a step-by-step guide on how to adjust tapered roller bearings to maximize their performance and lifespan.

Tools You Will Need for Bearing Adjustment

Properly adjusting bearings, especially in motorcycles, requires precision and the right tools. Each tool plays a specific role in ensuring that the bearings are installed correctly, adjusted for optimal performance, and maintained for longevity. Below is an explanation of why each tool is essential for the bearing adjustment process:

  1. Bearing Grease or Oil

Bearings require lubrication to reduce friction and wear during operation. Whether you’re using grease or oil depends on the specific bearing type and application. Proper lubrication prevents overheating, reduces friction, and extends the bearing’s life. During adjustment, applying fresh grease ensures that the bearings are well-lubricated, which is critical for maintaining smooth operation.

  • Why It’s Needed: Without proper lubrication, bearings can overheat, wear out quickly, or even fail completely. Lubrication is necessary for the optimal performance and longevity of bearings.
  1. Torque Wrench

A torque wrench allows you to tighten bolts and nuts to the manufacturer’s specified torque settings. Bearings must be installed with precise tension, as overtightening can cause binding, overheating, and premature wear, while under-tightening can lead to excessive play and poor performance.

  • Why It’s Needed: Ensuring that bolts are tightened to the correct torque is essential for avoiding damage to both the bearing and surrounding components. The right torque guarantees the bearing operates efficiently without excess friction.
  1. Bearing Puller

A bearing puller is a specialized tool used to safely and efficiently remove old or worn-out bearings from their housing or shafts. Pulling bearings manually or using the wrong tool can cause damage to the bearing or surrounding components.

  • Why It’s Needed: Bearings are often tightly fitted, and a bearing puller allows you to remove them without causing any damage to the housing or other parts. It ensures safe, damage-free removal during the adjustment or replacement process.
  1. Dial Indicator for Measuring End Play

A dial indicator is used to measure end play, which is the amount of axial movement in a bearing when it is adjusted. Too much end play can cause noise and reduce bearing life, while too little can lead to increased friction and heat. Using a dial indicator ensures that the bearing is adjusted within the recommended tolerances.

  • Why It’s Needed: Accurate measurement of end play is critical for ensuring proper bearing function. Without a dial indicator, you may risk incorrect adjustment, leading to poor performance and potential bearing failure.
  1. Socket Set or Appropriate Wrenches

A socket set or appropriate wrenches are necessary for loosening and tightening nuts, bolts, and other fasteners during the adjustment process. Different bearings and components may require different-sized tools, so having a complete set ensures you can handle any adjustments that arise.

  • Why It’s Needed: Without the right-sized tools, you can damage fasteners, strip bolts, or fail to achieve the proper tension required for safe bearing operation. A well-equipped socket set ensures that you can perform the adjustment without damaging components.
  1. Clean Rags for Wiping Down Parts

Clean rags are essential for wiping down the bearings and surrounding areas during the adjustment process. Any dirt, debris, or old lubricant on the bearing surfaces can lead to contamination, which reduces the bearing’s efficiency and can cause premature wear.

  • Why It’s Needed: Cleanliness is crucial when working with bearings. Dirt or contaminants can damage the precision surfaces of the bearings, reducing their lifespan and leading to premature failure.
  1. Safety Gloves and Goggles

Safety is paramount when working with mechanical components. Gloves protect your hands from cuts, abrasions, and exposure to chemicals like grease or oil, while goggles shield your eyes from debris, dust, and splashes of lubricant.

  • Why It’s Needed: Working with bearings involves handling tools, lubricants, and sometimes heavy components, so proper personal protective equipment (PPE) is necessary to prevent injury. Gloves ensure a secure grip, while goggles protect against potential hazards.

Having the right tools on hand will make the process more efficient and ensure accurate adjustments.

Step-by-Step Guide to Adjust Tapered Roller Bearings

Step 1: Preparation and Inspection

Before adjusting the tapered roller bearing, inspect the area where the bearing will be installed or adjusted.

  • Clean the Bearing and Surrounding Area:Ensure the bearing, its housing, and all surrounding components are clean. Any debris or dirt can cause damage during installation and adjustment. Use a clean rag and bearing-safe solvent to clean the parts thoroughly.
  • Inspect the Bearing:Check the tapered roller bearing for any signs of wear, damage, or corrosion. If there are visible signs of damage, it’s advisable to replace the bearing. (Name-Company) offers high-quality tapered roller bearings that are built for durability and performance.

Step 2: Install the Bearing

Once the bearing and surrounding area are clean and inspected, it’s time to install the tapered roller bearing. Follow these steps:

  • Grease the Bearing:Apply a thin layer of bearing grease or lubricant to the inner race of the bearing. This ensures smooth rotation and helps reduce friction during operation. You can choose a high-quality bearing grease that matches the requirements of your specific application.
  • Press the Bearing in Place:Position the bearing into its housing or onto the shaft. Ensure that the bearing is correctly aligned before pressing it in place. Use a bearing press or a hammer and block of wood to avoid damaging the bearing surfaces.

Step 3: Setting the Preload

Setting the correct preload is one of the most important steps in adjusting tapered roller bearings. Preload refers to the axial load applied to the bearing when installed, ensuring that there is no play or excessive movement in the bearing assembly.

  • Tighten the Nut:Use a wrench or socket set to tighten the nut that secures the bearing assembly. Initially, tighten the nut to remove any slack in the assembly. Be careful not to overtighten, as this can lead to excessive preload and bearing damage.
  • Rotate the Bearing:As you tighten the nut, rotate the bearing assembly by hand to ensure it moves smoothly. If the bearing feels rough or too tight, loosen the nut slightly and continue rotating until it feels smooth.
  • Check Preload with a Torque Wrench:Use a torque wrench to tighten the nut to the manufacturer’s recommended torque specifications. These specifications can vary depending on the application, so always consult the bearing or equipment manual. Too little preload can lead to play, while too much preload can cause excessive wear and heat buildup.

Step 4: Measuring End Play

After setting the preload, it’s essential to measure the end play (the axial movement or clearance in the bearing assembly). This ensures that the bearing is not too tight or too loose.

  • Attach a Dial Indicator:Set up a dial indicator to measure the axial movement of the bearing assembly. Place the indicator tip against a stable surface, such as the bearing housing, and zero out the indicator.
  • Check the Movement:Move the bearing assembly back and forth along the shaft, and observe the dial indicator reading. The amount of end play should be within the manufacturer’s specified range. Typically, this will range from 0.001 to 0.005 inches, depending on the application.
  • Adjust if Necessary:If the end play is outside the recommended range, adjust the bearing preload by tightening or loosening the securing nut until the correct end play is achieved.

Step 5: Final Locking and Rechecking

Once the preload and end play are correctly set, secure the bearing assembly:

  • Lock the Nut in Place:Use a locking nut, washer, or retainer to keep the adjustment nut in place. This prevents the bearing from loosening during operation.
  • Recheck the Bearing:After locking the assembly, rotate the bearing once again to ensure that it moves freely and smoothly. If any resistance or noise is detected, the bearing may need to be readjusted.

Step 6: Re-Lubrication

Proper lubrication is crucial for tapered roller bearings to minimize friction and wear.

  • Apply Lubricant:After the final adjustment, apply an appropriate lubricant to the bearing. Depending on the application, you may use bearing grease, oil, or specialized high-performance lubricants.
  • Ensure Full Coverage:Make sure the bearing is fully coated with lubricant to avoid metal-to-metal contact during operation. For heavily loaded applications, consider using synthetic lubricants for better heat resistance and longevity.

Troubleshooting Common Issues in Tapered Roller Bearing Adjustment

Even with careful adjustment, you may encounter some issues with tapered roller bearings. Here are some common problems and solutions:

  • Overheating:If the bearing overheats during operation, it could be due to excessive preload or improper lubrication. Recheck the preload and ensure the correct type and amount of lubricant is used.
  • Noise or Vibration:Excessive noise or vibration indicates that the bearing may be too loose or misaligned. Recheck the end play and ensure the bearing is properly seated and aligned.
  • Premature Wear:Premature wear could result from dirt contamination or insufficient lubrication. Always ensure the bearing and its environment are clean before installation and maintain a proper lubrication schedule.
Why Choose us for High-Quality Tapered Roller Bearings?

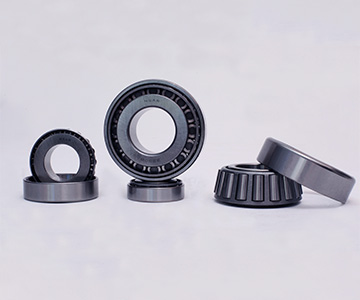
At NSAR, we specialize in providing high-quality tapered roller bearings designed for durability, performance, and precision. Our bearings are made from premium materials and are rigorously tested to meet the demanding requirements of automotive, industrial, and heavy-duty applications.

Whether you need standard bearings or require OEM customization, we offer a range of solutions tailored to your specific needs. Our tapered roller bearings are engineered to deliver reliable performance under extreme conditions, ensuring optimal load distribution, reduced friction, and enhanced longevity.

Proper adjustment of tapered roller bearings is essential for ensuring long-lasting performance and avoiding premature wear. By following this step-by-step guide, you can achieve the correct preload, minimize end play, and ensure smooth operation in your machinery or vehicles. Remember that investing in high-quality bearings, such as those from NSAR, is crucial for maximizing reliability and performance.

If you need assistance with choosing the right tapered roller bearings or have questions about OEM customization, feel free to contact us today. Let us help you find the perfect solution for your application.